


I have had requests for a while on simple sewing tutorials, and what better way to start than with one of the easiest DIY designs, a circle skirt.
Since the 1950's when they first became popular, circle skirts have come in and out of fashion but seem to remain somewhat en vogue due to the simplicity with which they are made.
You don't need a pattern for this, just follow the instructions and you will be wearing a gorgeous self creation in no time.
This is part one, in part two I'll be inserting the zipper and finishing the garment.
You will need:
Materials
Materials
1.5 yards of light to medium weight fabric
Sewing thread
A large size snap button or hook and slide.
7" zipper
Tools
Fabric scissors
Pins
Tailor's chalk(optional, you can use pins)
Rulers or measuring Tape
Sewing machine
Measurements
Waist
Length of skirt
1. Your waist measurement is like the circumference of a circle. You will need the radius of that measurement for this exercise. Making sure that you add on an inch or two for the seam allowance, divide your measurement by 3.14, and then by 2. You will then have the radius.
1. Your waist measurement is like the circumference of a circle. You will need the radius of that measurement for this exercise. Making sure that you add on an inch or two for the seam allowance, divide your measurement by 3.14, and then by 2. You will then have the radius.
For example, if your waist measurement is 29" you will get a radius of 4.9"
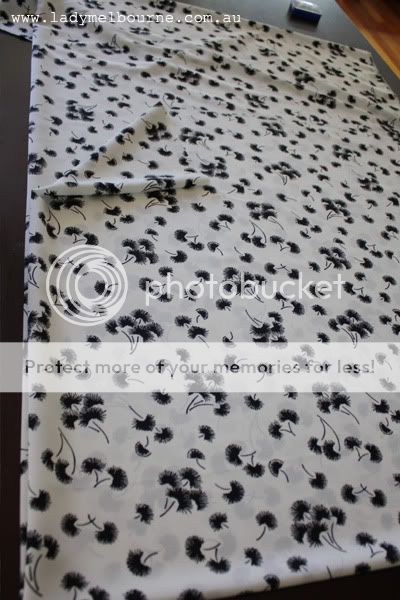
2. Folding
Fold your fabric in half horizontally, and then in half again vertically, as shown in the picture.
 3. Create your waist line.
From the corner fold, measure your radius measurement from the center, and then at various points until you get to the edges, or folds of the fabric. You can either use tailors chalk or pins to mark the fabric.

4. Measure the length of the skirt from the beginning of your radius measurement, as seen in the photo below. Make sure you measure around the angle as you did for the waistline so that your hemline is even! In this case, I have measured the length of the skirt as 25" including seam allowance.

5. Cutting
Cut along your measured lines.
 5.a As the fabric has been folded twice, don't forget to cut along the fold on one side as seen in the photo below, this will create the side seams.
 6. Pattern pieces
You should now have 2 identical pieces cut out as shown below.

7. Sew along the side seam, allowing 1/2" for seam allowance.

8. Pinned at the side, this is what your skirt should now look like.
 I'll add my disclaimer here that I have no professional training in pattern making or sewing. Mother Melbourne taught me to dress make when I was a teenager, and since then I have continued to learn from her and teach myself.
If you have anything to add that might be helpful to others, please leave a message in the comments section, I might even update the post if it's useful.
In part two I will be adding the zip and finishing the garment.
Happy sewing!
LM
x
20 comments:
Thank you for this pattern and directions; I've just resurrected my sewing machine and this might just get me over the hot weather this week! Well, this and a few other things.
I hope it gives you some relief, it's what I'll be doing to keep cool this week...amongst other things!
I think that these are a really great idea Lady M!
Looking forward to keeping up with them.
Xx
thanks for the confirmation, i was wondering if thats how you did it but didnt want to waste material experimenting.
You know what - I'm probably the world's worst at making anything. I can't even thread a sewing machine. I'm hopeless at sewing on buttons. But I have to say, after reading your step by step instructions on how to make a skirt, you know what, I reckon I could make one. Gonna give it a whirl. Now to find the right material.
What a gorgeous pattern! Vintage patterns are the best! I'm loving circle skirts at the moment and have made a few myself too. Will look forward to seeing how you do the hemming as I always find this the hardest part - I often do a gathered waist just to make hemming easier!!
this is great, i can't wait for part 2
Thank you so much for this pattern !
http://mimietnini.canalblog.com/
Eeeeh! I'm looking forward to trying this out.
Oh this is brilliant!
I am still a novice at making my own clothes but this looks very doable. Shall attempt later this week for sure. Merci Lady M! :)
This is fabulous- thank you!!! and oh sew simple!
I cannot wait to try it out! xo
thanx for that! do you think this skirt would look good ankle length???
this is exactly why i love your blog!!! as a bit of a sewer myself (as i'm a home economics teacher), i'm sure that a tute on a simple gathered skirt would be appericated. i know my students ALWAYS want to know how to do it xo
Darling Lady Melbourne, you are marvelous! Than you for this, I will definitely try it out!
I love circle skirts, they are so simple to make but hemming them is a nightmare!
XXASAB
Great post with sewing lessons! I love Carrie Bradshaw style
thanks for the tutorial...thinking about making my own circle skirt now :) you have exactly the same sewing machine as me :D
wewontgothere.blogspot.com
I will have to make one, as soon as I have some spare time!
Before I return the unused sewing machine I've had for 4 months, I will be sure to make this!
You've made it look so easy that even I might manage!
Sadly as the grand daughter of a professional seamstress, I have not inherited 1 single sewing gene :(
But I will persevere..
xx
Post a Comment